Mastering Instagram Automation with ManyChat: DM & Story Reply Automation (Part 1)
Pragnakalp Techlabs > Automation > Mastering Instagram Automation with ManyChat: DM & Story Reply Automation (Part 1)
Introduction
Instagram interactions are vital for growing your brand and engaging with your audience, but manually managing replies and comments can be time-consuming. ManyChat simplifies this process with its automation tools, allowing you to focus on creating impactful content while staying connected with your followers.
In this first part of our guide, we’ll explore how to integrate your Instagram account with ManyChat and set up Story Reply Automation. By automating these processes, you can deliver faster, more personalized responses and keep your engagement levels high.
Integrating Your Instagram Account with ManyChat
Follow these steps to connect your Instagram account to ManyChat:
1. Create a ManyChat Account Sign up for a ManyChat account if you don’t already have one.
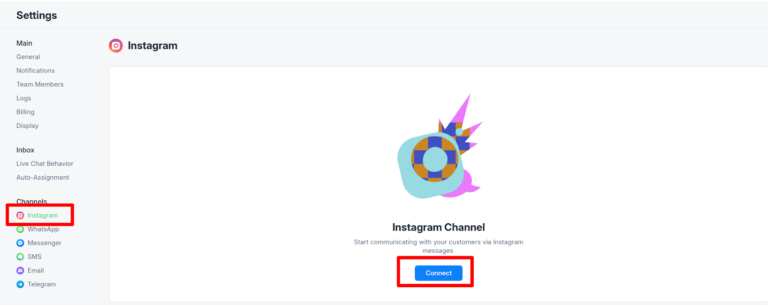
2. Access Instagram Settings Navigate to the Settings tab in ManyChat and select Instagram from the Channels menu.
3. Connect Your Instagram Account Click the Connect button and grant the necessary permissions to allow ManyChat to access your Instagram media and chat.
Once connected, your Instagram account will be ready for automation through ManyChat.
Manychat DM automation
Direct messaging is a powerful way to connect with your audience on Instagram, but managing replies manually can be time-consuming. ManyChat DM automation takes the hassle out of this process by allowing you to use keywords to automate your direct message replies, ensuring prompt and personalized interactions.
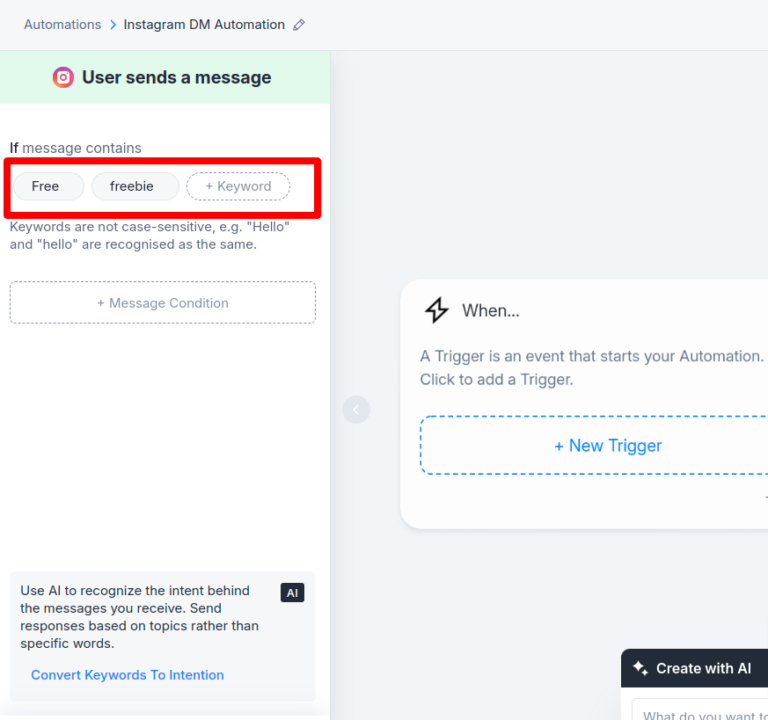
With keyword-based automation, you can easily trigger specific flows to deliver relevant content to your followers. For instance, if you’re offering a free resource, you can instruct your followers to DM a specific word like “freebie” to receive it. When followers send this keyword in their DMs, ManyChat automatically sends them a message with the desired content, such as a link to a PDF.
Let’s say you’re promoting free courses. You can create an automation where users who DM the words “Free” or “Freebie” automatically receive a message with a link to the courses. This ensures timely engagement and a seamless user experience, while also boosting your promotional efforts.
Here’s how you can set up keyword-based DM automation in ManyChat:
Steps to Set Up ManyChat DM Automation
1. Login to Your ManyChat Account
Begin by logging into your ManyChat account.
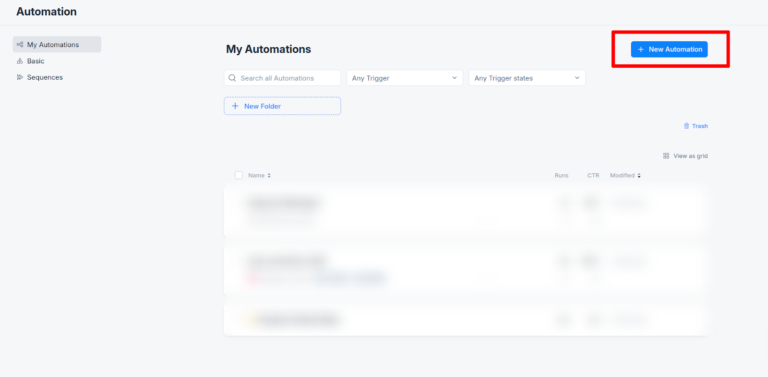
2. Navigate to the Automation Tab
Go to the “Automation” tab on the ManyChat dashboard and create a new automation.
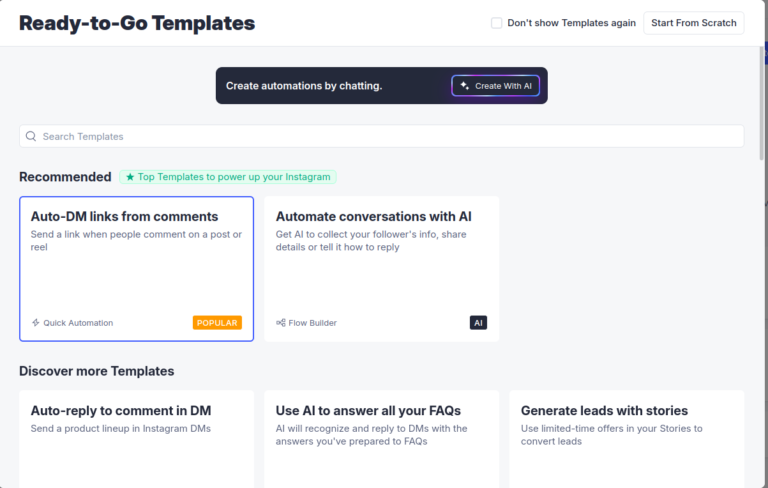
3. Choose a Template or Start from Scratch
ManyChat provides several Ready-to-Go Templates for quick setup. If none meet your needs, click “Start from Scratch” to create a custom flow.
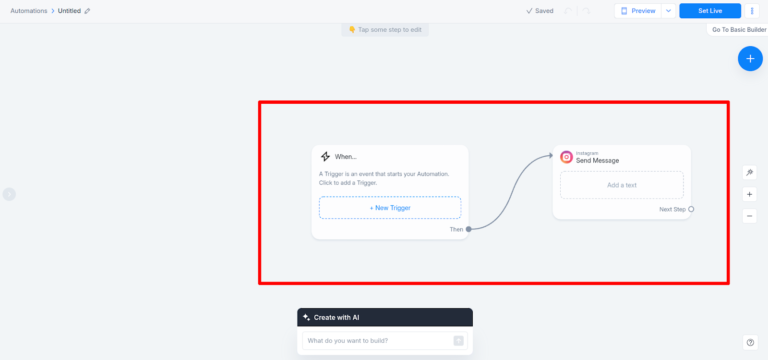
4. Set Up a Trigger for Instagram Messages
Once your basic flow is created, click on the first widget.
Set a new trigger by clicking “New Trigger” and selecting “Instagram Message” as the trigger type.
Specify the keywords that will activate the flow. For example, we promote free courses, so we will use keywords like “Free” or “Freebie.”
5. Add Multiple Triggers if Needed
You can add more than one keyword trigger to a single widget, making your flow versatile and accommodating various user inputs.
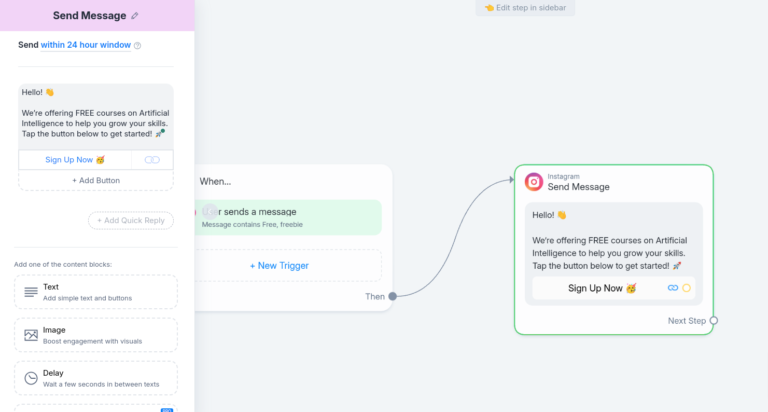
6. Add a Reply Message
Create a reply message that will be sent to users when they trigger the flow.
Once your message is ready, click the Set Live button at the top to activate the automation.
Here’s an example screenshot of an Instagram chat showcasing how the ManyChat DM automation works in action. When a user sends a keyword like “Freebie,” the automation instantly responds with a pre-configured message, providing the relevant link or information seamlessly.
Setting Up Your Story Reply Automation
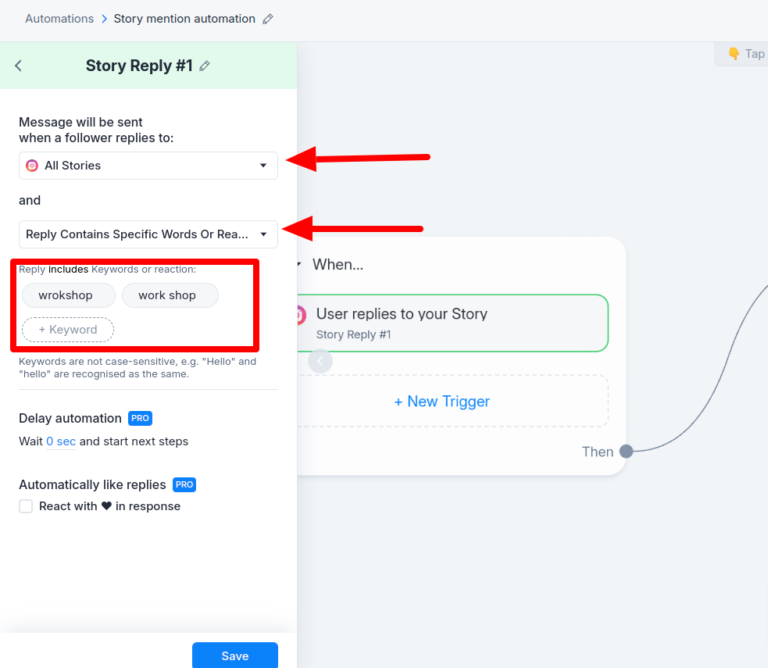
To set up a Story Reply Automation in ManyChat, start by creating a new automation and selecting “Story Reply” as the trigger. You can enable the automation for all story replies or for specific stories. Additionally, you can configure the automation to detect specific keywords and respond accordingly.
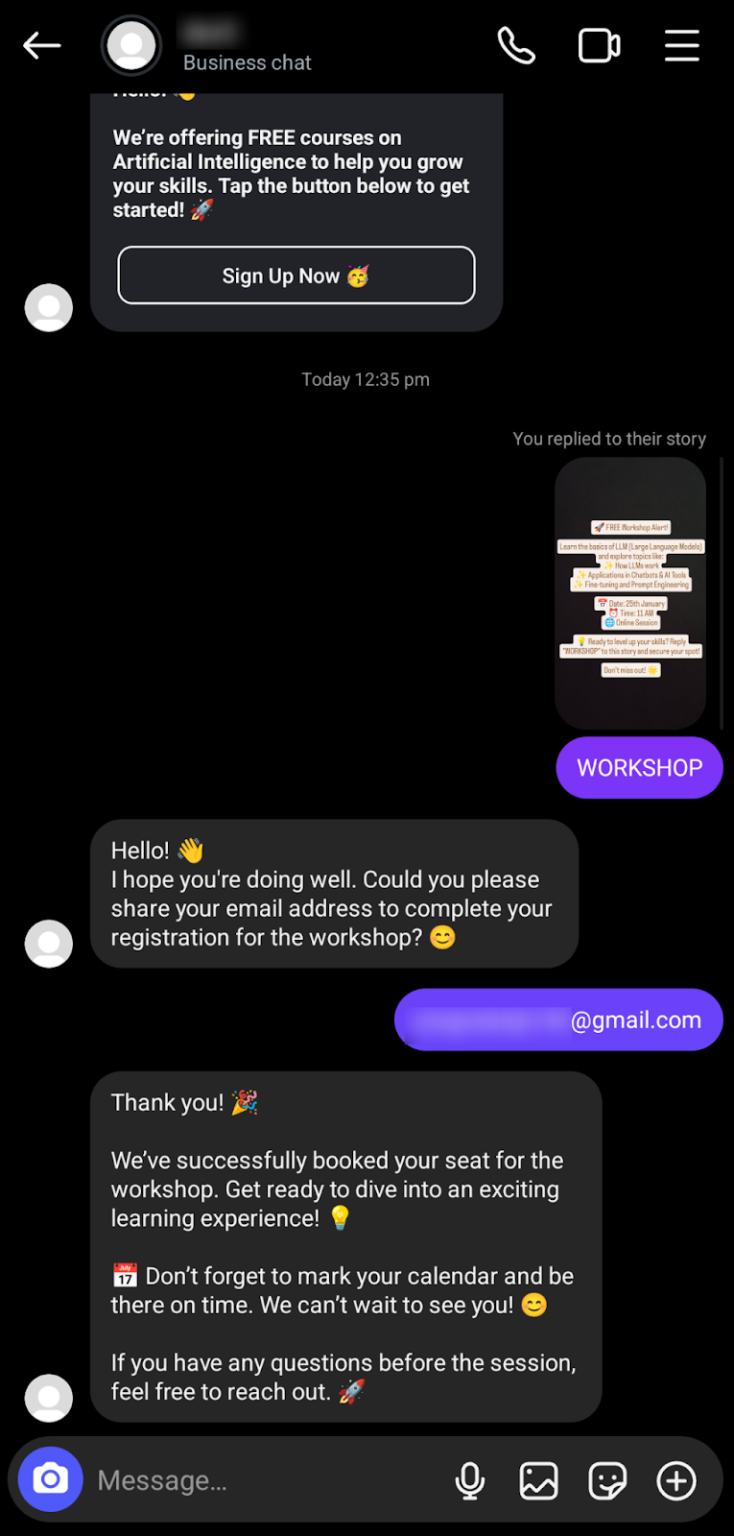
Here, we are setting up automation for a workshop. When a user replies with the keyword “workshop” to your story, the automation will prompt them to provide their email address for successful registration, ensuring a seamless and efficient process.
Setting Up Story-Specific Automation
1. Select the First Widget
Click on the first widget in your ManyChat automation flow.
2. Choose the Story
Select the specific story for which you want to start the automation.
3. Add Keywords for Detection
Define the keywords you want the automation to detect in the story replies. These keywords will trigger your automated response when users reply to your story.
Ask the user for the email address
In the second widget, set up a response to collect the user’s email address:
1. Add a Content Block for Data Collection Include a content block in the widget to gather the necessary information from the user.
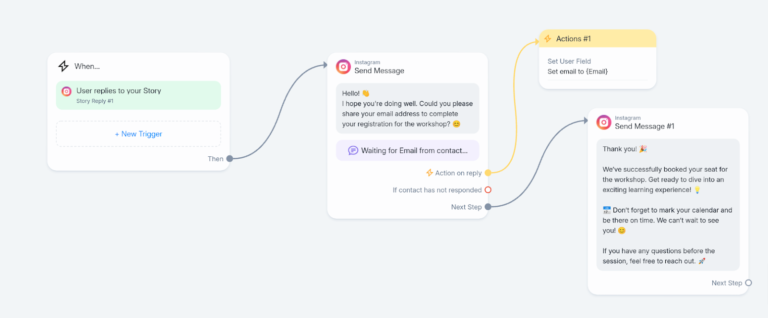
2. Enter an Appropriate Message Write a message asking the user for their email address. For instance: “Great! Please provide your email address so we can complete your workshop registration.”
3. Configure the User’s Reply
Set the Contact’s Reply type to ‘Email.’
Ensure the system validates the input to confirm it’s a valid email format.
4. Perform Actions on Successful Input
After receiving the email, select the ‘Perform Actions’ option.
Use this action to save the email information for future use, such as sending workshop details or follow-ups.
You can enhance the automation by handling scenarios where users don’t respond, provide invalid input, or need flexibility during the interaction:
1. Set a Next Step for Non-Response
Configure the automation to take action if the user doesn’t respond within a specified time frame.
2. Handle Invalid Input
Add a response for invalid user input to ensure clarity.
For instance, if the user enters an incorrect format, send a message like: “It looks like the email you provided isn’t valid. Please enter a valid email address to continue.”
3. Enable a Skip Option
Include a “Skip” button to give users the flexibility to bypass the email collection step if they choose.
4. Configure Retry Attempts
Set the number of retries allowed for the user to provide valid input.
Storing the Email Information
To store the email information provided by the user, follow these steps:
1. Add an Action Widget
Drag and drop an Action widget into your flow after the email collection step.
2. Select the “Set User Field” Action
In the Action widget, choose “Set User Field” as the action type.
3. Enter Field Type and Value
Define the field where the email information will be stored. For example:
Field Type: Email
Value: {{user_input}} (This represents the email entered by the user.)
4. Save the Action
Ensure the action is saved so that the email data is securely stored for future use, such as sending notifications or workshop details.
This setup ensures that all collected email addresses are saved efficiently and can be accessed whenever required.
Setting Up the Registration Confirmation Response
To confirm registration and provide a response to the user:
1. Add a “Send Message” Widget
Drag and drop the “Send Message” widget into your automation flow after the email collection and storage actions.
2. Set Instagram as the Message Type
In the “Send Message” widget, select “Instagram Send Message” as the next step.
3. Compose a Confirmation Message
Write a personalized response to confirm the registration. For example: “Thank you for registering! We’ve successfully received your email address. You’ll soon receive all the workshop details in your inbox. Stay tuned!”
4. Connect the Widgets
Link the “Send Message” widget to the previous steps in the flow to ensure a smooth transition.
Final Automation Flow
After adding the confirmation response, your automation flow will look like this:
1. Trigger: “Story Reply” with keyword detection.
2. Collect Email: Request and validate the user’s email address.
3. Action: Store the email information using the “Set User Field.”
4. Confirmation: Send a message confirming successful registration.
This ensures a complete, seamless experience for the user from start to finish.
Here’s a screenshot of an Instagram chat demonstrating how the automation works when a user replies with “workshop” to your story. The automation instantly responds by asking for the user’s email address, and once the email is provided, it sends a confirmation message. This highlights how efficiently the automation handles user interactions.
You can view the system fields and the email provided by the user within the “Contacts” tab. Simply select the specific user, and you’ll see their details, including the email value they entered during the automation flow. This helps in managing and utilizing user data effectively for future interactions.
Conclusion
With your Instagram account successfully integrated into ManyChat and Story Reply Automation in place, you’ve taken the first step toward simplifying your interactions. By automating this essential task, you can ensure your audience feels heard and valued without dedicating hours to manual replies.
Explore Part 2 of this blog, where we provide an in-depth guide on Post Comment Reply Automation and crafting effective ManyChat Sequences to elevate your Instagram engagement strategy.
Pragnakalp Techlabs: Your trusted partner in Python, AI, NLP, Generative AI, ML, and Automation. Our skilled experts have successfully delivered robust solutions to satisfied clients, driving innovation and success.