
Dialogflow’s fulfillment feature is a very powerful feature that enables Dialogflow agent to communicate with our server. It comes in very handy when we want to use any data from our database or third party source in our Dialogflow based chatbot.
To utilize Dialogflow Fulfillment, we need to create a webhook URL which will be a communication point for Dialogflow agent. There are multiple ways to create webhook and one we have already discussed in our previous blog: Dialoflow webhook tutorial using Python + Flask. Today, we are going to go through webhook creation using Python only but this time with Django. Django is a popular web framework in Python. It is being used by many big websites/organizations in the world and many developers prefer it due to its built-in development features.
So, let’s get started! We’ll start from the very basic.
Install Python
Download and install python from here as per your supported OS.
Install Django
Once Python is setup, installing Django is very easy. Though, the steps required for its installation depends on your operating system. It can be easily installed using PIP
pip install Django
Create Django Project
After installation, we need to create a project.
Open terminal or cmd prompt and navigate to the place where you want to create a project, then run below command in terminal or cmd:
django-admin startproject djangotest
This will create “djangotest” project with following directory structure:
djangotest/
    manage.py
    djangotest/
        __init__.py
        settings.py
        urls.py
        wsgi.py
Now that your project is created, to make it work, you need to apply migrations for app. First browse to the “djangotest” directory by
cd djangotest
command and then run below command to apply them.
python manage.py migrate
You should get the result as below or similar on running the above code.
Operations to perform:
   Apply all migrations: admin, auth, contenttypes, sessions
 Running migrations:
   Applying contenttypes.0001_initial… OK
   Applying auth.0001_initial… OK
   Applying admin.0001_initial… OK
   Applying admin.0002_logentry_remove_auto_add… OK
   Applying admin.0003_logentry_add_action_flag_choices… OK
   Applying contenttypes.0002_remove_content_type_name… OK
   Applying auth.0002_alter_permission_name_max_length… OK
   Applying auth.0003_alter_user_email_max_length… OK
   Applying auth.0004_alter_user_username_opts… OK
   Applying auth.0005_alter_user_last_login_null… OK
   Applying auth.0006_require_contenttypes_0002… OK
   Applying auth.0007_alter_validators_add_error_messages… OK
   Applying auth.0008_alter_user_username_max_length… OK
   Applying auth.0009_alter_user_last_name_max_length… OK
   Applying auth.0010_alter_group_name_max_length… OK
   Applying auth.0011_update_proxy_permissions… OK
   Applying sessions.0001_initial… OK
Project creation is done. A Django project can have multiple applications so we need to create an application for our webhook. To do that, navigate to “djangotest” directory in terminal or cmd and run below command to create an app.
python manage.py startapp myapp
“myapp” is the name of the application we created. You can provide a name whatever you want. This command creates a “myapp” folder with the following structure
myapp/
    __init__.py
    admin.py
    apps.py
    models.py
    tests.py
    views.py
Now we need to register our newly created app with our project “djangotest”. To do this open /djangotest/settings.py file and add app name.
INSTALLED_APPS = [
             'django.contrib.admin',
             'django.contrib.auth',
             'django.contrib.contenttypes',
             'django.contrib.sessions',
             'django.contrib.messages',
             'django.contrib.staticfiles',
             'myapp',
 ]
Creating webhook using Django
Let’s first create a normal page which will display Hello World! message.
To do that, we need to define a function in /djangotest/myapp/views.py file
from django.shortcuts import render
# import HttpResponse to view result
from django.http import HttpResponse

# define home function
def home(request):
    return HttpResponse('Hello World!')
Now, route needs to be defined in /djangotest/djangotest/myapp/urls.py file.
from django.urls import path
from myapp import views
urlpatterns = [
    # define a route for home
    path('home/', views.home, name='home'),
]
We are all set! Time to kickoff the application executing below command:
python manage.py runserver
You should get the result as below or similar on running the above code.
System check identified no issues (0 silenced).
May 16, 2019 - 20:28:26
Django version 2.2.1, using settings djangotest.settings'
Starting development server at http://127.0.0.1:8000/
Quit the server with CTRL-BREAK.
Open the browser and access http://127.0.0.1:8000/home. You should see output as below.

Congratulations! Our Django app is working now. But as it is on a local system it can not be accessed from the outside world. To integrate it as webhook for Dialogflow, we need to make it live/online. For that, we will use ngrok.
Ngrok is a web tunneling tool that can be used to call webhook from your local server. You can download Ngrok from ngrok.io.
After installing ngrok, use the following command: ngrok http <port number>
In our case, django app is running on port 8000 so port number will be 8000
ngrok http 8000
It will have output as below
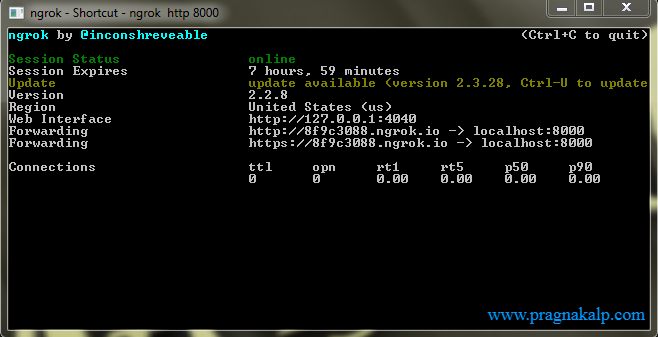
Ngrok generates a random URL for the local server. To run a local server by this URL we need to add this URL in ALLOWED_HOSTS in /djangotest/djangotest/settings.py
ALLOWED_HOSTS = [
         '8f9c3088.ngrok.io',
        '127.0.0.1'
 ]
After adding this URL we can access a local server from the outside world.
Note: Make sure that manage.py is running (use python manage.py runserver) in separate terminal while using ngrok otherwise webhook will give error.
Create a /webhook URL for your webhook
First, we need to create a /webhook URL which we’ll provide as a Fulfillment URL in Dialogflow. To do that, let’s add a “webhook” route in the /djangotest/djangotest/urls.py file so urls.py file would look like below:
from django.urls import path
from myapp import views
urlpatterns = [
    # define a route for home
    path('home/', views.home, name='home'),
    path('webhook/', views.webhook, name='webhook'),
]
Building fulfillment responses from webhook
Dialogflow expects a response from webhook in particular JSON format which will be parsed and proper output will be displayed to user.
We are going to build some responses in python using these formats. Types of available responses are: Simple Response, Basic Card, Suggestions, List Card, Browse Carousel, Carousel Response.
Below code will prepare a simple JSON response with fulfillment text for Dialogflow. The user will receive “This is Django test response from webhook.” as a response when webhook will be called.
We need to edit /djangotest/myapp/views.py file and add the code to handle requests coming on /webhook url.
The views.py file should look like below.
from django.shortcuts import render
from django.http import HttpResponse, JsonResponse
from django.views.decorators.csrf import csrf_exempt
import json

# define home function
def home(request):
    return HttpResponse('Hello World!')

@csrf_exempt
def webhook(request):
    # build a request object
    req = json.loads(request.body)
    # get action from json
    action = req.get('queryResult').get('action')
    # return a fulfillment message
    fulfillmentText = {'fulfillmentText': 'This is Django test response from webhook.'}
    # return response
    return JsonResponse(fulfillmentText, safe=False)
NOTE: CSRF_exempt is required by Django to provide easy-to-use protection against Cross-Site Request Forgeries.
How to setup webhook in Dialogflow
Dialogflow provides an option on the left sidebar known as Fulfillment. Just enter your webhook url generated by ngrok on fulfillment page and you are done.

Make sure you are adding url /webhook not just ngrok URL. So, it should look like https://c5c439af.ngrok.io/webhook/.
Enabling webhook for intents
Now, we need to enable the webhook for intents that needs to communicate with our server data. To do that, open the intent for which you want to enable webhook, scroll down to the end and enable the “Enable webhook call for this intent” switch.

Whenever this intent is invoked, it will send a request to your webhook and respond as per the response set from the webhook.
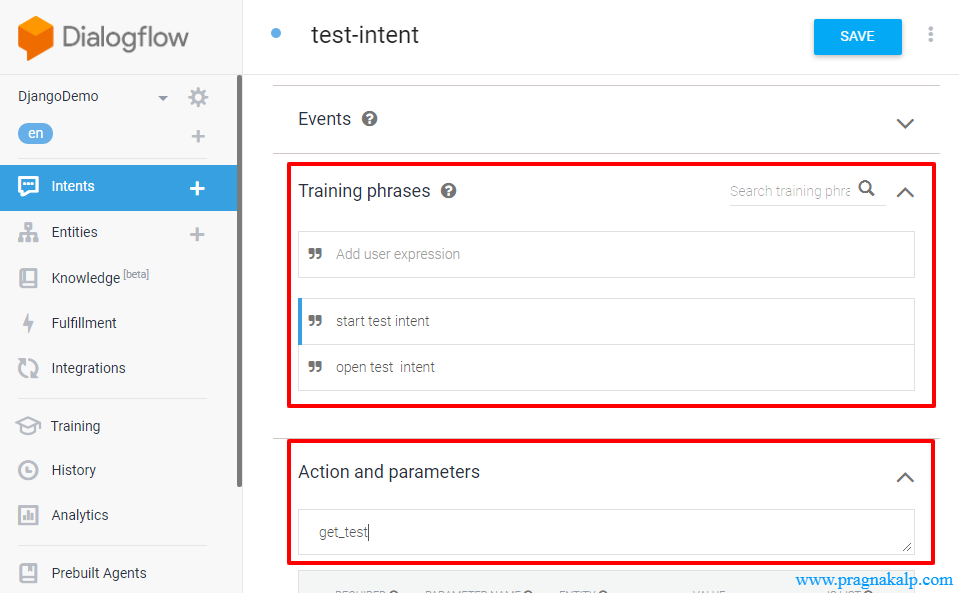
Setup training phrases and action for the intent
Training phrases are the sentences that help the agent to identify/invoke the particular intent.
Action can be used in our webhook to process request. We have multiple intents that invoke webhook in this case we use an action to identify intent and based on this we prepare responses.
Checking response from webhook
Using console on the right side of the window, we can invoke the intent and check the response. For our example, the response will be as below:

Clicking on “DIAGNOSTIC INFO” button, we can view all detail about the request being sent from Dialogflow and response being sent from our webhook. “DIAGNOSTIC INFO” can also be very useful for debugging, if you have any error in your webhook.
Simple webhook is created. Now if you want to add other types of responses in webhook then, you can create JSON as per your requirement. Refer to this response samples for more details.
Using library to prepare responses
We have created Python Library to simplify building the JSON responses for Dialogflow. We will explain here how to integrate this library with Django and easily create different types of responses quickly.
Apart from Simple Response there are other types of responses possible for Google Assistant as listed below:
- Suggestion chips
- Basic card
- List
- Link out suggestion
- Carousel card
Let’s explore Suggestion Chips.
Suggestion Chips Example
Create intent for suggestion chips. In our example, we have created intent “Suggestion chips example”. In the intent, add training phrases which will be used to invoke this intent.

Then enable “Enable webhook call for this intent” option. And set action “get_suggestion_chips” which will be used in webhook code to differentiate response.

Now our intent is ready. Next, we need to prepare a JSON response for suggestion chips.
As we are going to use Dialogflow webhook response library to generate a JSON response. Download this library and put it in /djangotest/library/df_response_lib.py directory.
In our example, we prepare responses in /djangotest/myapp/views.py so the code would be as below in views.py file.
from django.shortcuts import render
from django.http import HttpResponse, JsonResponse
#import csrf from CSRF protection
from django.views.decorators.csrf import csrf_exempt
#import df_library
from library.df_response_lib import *
#import json to get json request
import json

# define home function
def home(request):
    return HttpResponse('Hello World!')

@csrf_exempt
def webhook(request):
    # build request object
    req = json.loads(request.body)
    #get action from json
    action = req.get('queryResult').get('action')
    # prepare response for suggestion chips
    if action == 'get_suggestion_chips':
        # set fulfillment text
        fulfillmentText = 'Suggestion chips Response from webhook'
        aog = actions_on_google_response()
        aog_sr = aog.simple_response([
            [fulfillmentText, fulfillmentText, False]
        ])
        #create suggestion chips
        aog_sc = aog.suggestion_chips(["suggestion1", "suggestion2"])
        ff_response = fulfillment_response()
        ff_text = ff_response.fulfillment_text(fulfillmentText)
        ff_messages = ff_response.fulfillment_messages([aog_sr, aog_sc])
        reply = ff_response.main_response(ff_text, ff_messages)
    # return generated response
    return JsonResponse(reply, safe=False)
Now, we need to run server using following command in terminal or cmd prompt.
python manage.py runserver
Using console on right side of the window, we can invoke the intent and check the response. For our example, the response with Suggestion Chips from webhook will be as below:

In this blog, we have covered Suggestion Chips only. We have created a github repository with code for all other types of responses. You can download the code from there and modify it as per your requirement.
Feel free to comment your doubts/questions. We would be glad to help you.
If you are looking for Chatbot Development or Natural Language Processing services then do contact us or send your requirement at letstalk@pragnakalp.com. We would be happy to offer our expert services.
a lots of error jason response
http://c0b14d1a.ngrok.io dont add (/webhook ) if you add error 404 or 500 occur it takes me alot of time to solved this issue
How did you solve?
I’m still having 404 and 500 err.
thanks
Can you help me please
I’m with this error
C:\Users\kleiton.oliveira\Documents\Projetos\djangotest>python manage.py runserver Watching for file changes with StatReloader Performing system checks… Exception in thread django-main-thread: Traceback (most recent call last): File “C:\Users\kleiton.oliveira\AppData\Local\Programs\Python\Python37-32\lib\threading.py”, line 926, in _bootstrap_inner self.run() File “C:\Users\kleiton.oliveira\AppData\Local\Programs\Python\Python37-32\lib\threading.py”, line 870, in run self._target(*self._args, **self._kwargs) File “C:\Users\kleiton.oliveira\AppData\Local\Programs\Python\Python37-32\lib\site-packages\django\utils\autoreload.py”, line 54, in wrapper fn(*args, **kwargs) File “C:\Users\kleiton.oliveira\AppData\Local\Programs\Python\Python37-32\lib\site-packages\django\core\management\commands\runserver.py”, line 117, in inner_run self.check(display_num_errors=True) File “C:\Users\kleiton.oliveira\AppData\Local\Programs\Python\Python37-32\lib\site-packages\django\core\management\base.py”, line 390, in check include_deployment_checks=include_deployment_checks, File “C:\Users\kleiton.oliveira\AppData\Local\Programs\Python\Python37-32\lib\site-packages\django\core\management\base.py”, line 377, in _run_checks return checks.run_checks(**kwargs) File “C:\Users\kleiton.oliveira\AppData\Local\Programs\Python\Python37-32\lib\site-packages\django\core\checks\registry.py”, line 72, in run_checks new_errors = check(app_configs=app_configs) File “C:\Users\kleiton.oliveira\AppData\Local\Programs\Python\Python37-32\lib\site-packages\django\core\checks\urls.py”, line 13, in check_url_config return check_resolver(resolver) File “C:\Users\kleiton.oliveira\AppData\Local\Programs\Python\Python37-32\lib\site-packages\django\core\checks\urls.py”, line 23, in check_resolver return check_method() File “C:\Users\kleiton.oliveira\AppData\Local\Programs\Python\Python37-32\lib\site-packages\django\urls\resolvers.py”, line 398, in check for pattern in self.url_patterns: File “C:\Users\kleiton.oliveira\AppData\Local\Programs\Python\Python37-32\lib\site-packages\django\utils\functional.py”, line 80, in __get__ res = instance.__dict__[self.name] = self.func(instance) File “C:\Users\kleiton.oliveira\AppData\Local\Programs\Python\Python37-32\lib\site-packages\django\urls\resolvers.py”, line 579, in url_patterns patterns = getattr(self.urlconf_module, “urlpatterns”, self.urlconf_module) File “C:\Users\kleiton.oliveira\AppData\Local\Programs\Python\Python37-32\lib\site-packages\django\utils\functional.py”, line 80, in __get__ res = instance.__dict__[self.name] = self.func(instance) File “C:\Users\kleiton.oliveira\AppData\Local\Programs\Python\Python37-32\lib\site-packages\django\urls\resolvers.py”, line 572, in urlconf_module return import_module(self.urlconf_name) File “C:\Users\kleiton.oliveira\AppData\Local\Programs\Python\Python37-32\lib\importlib\__init__.py”, line 127, in import_module return _bootstrap._gcd_import(name[level:], package, level) File “”, line 1006, in _gcd_import File “”, line 983, in _find_and_load File “”, line 967, in _find_and_load_unlocked File “”, line 677, in _load_unlocked File “”, line 728, in exec_module File “”, line 219, in _call_with_frames_removed File “C:\Users\kleiton.oliveira\Documents\Projetos\djangotest\djangotest\urls.py”, line 2, in from myapp import views File “C:\Users\kleiton.oliveira\Documents\Projetos\djangotest\myapp\views.py”, line 6, in from library.df_response_lib import * ModuleNotFoundError: No module named ‘library’
Thank you in Advance
Hello Kleiton,
Looks like you have misplaced df_response_lib.py file.
“C:\Users\kleiton.oliveira\Documents\Projetos\djangotest\myapp\views.py”, line 6, in from library.df_response_lib import * ModuleNotFoundError: No module named ‘library’
As I can see last error, You have to download DF Library from
https://github.com/pragnakalp/dialogflow-webhook-response-libary-in-python
and place “df_response_lib.py ” file into “/djangotest/library/” directory.
In your case, the path should be
C:\Users\kleiton.oliveira\Documents\Projetos\djangotest\library\df_response_lib.py
Thank you for the blog(매우 고맙습니다 in Korean).
However, I have an error as follows;
“webhookStatus”: {
“code”: 13,
“message”: “Webhook call failed. Error: 500 Internal Server Error.”
}
The first error I encountered was “DEBUG = True” in setting.py, which should be fixed into “DEBUG = False” according to the suggestion of the system(it was wrote at the bottom of the page, xxx.ngrok.io/webhook).
The first error was 404 error.
After I fix the 404 error by changing True into False, 500 error followed at the port forwarded page by ngrok.
Would you kindly give a tip I can fix this?
Hello parandurume,
It looks like you have not set up ngrok URL properly. Please follow our tutorial again to setup ngrok for django.
tried every thing but error 403 is still existing
Hello James Dane,
The error 403 could be happening for multiple reasons. Can you share your code of views.py and settings.py files please? We’ll be able to assist better after checking code.
Hi, I have problem in using your library response. I followed your provided codes in this tutorial and it worked fine until the last chapter, the suggestion chips. When I test the code through Dialogflow, the response I got from terminal is:
File “C:\Users\My PC\Documents\GitHub\djangodf\quizbot\webhook\views.py”, line 31, in webhook
return JsonResponse(reply, safe=False)
UnboundLocalError: local variable ‘reply’ referenced before assignment
Here is my views.py code: https://pastebin.com/qeWy8ALa
If you could explain where I did wrong, I would really appreciate it.
Are you sure when you get webhook request your action is ‘get_suggestions_chips’?
Because you have initiated the “reply” variable in if condition. When given if condition for action will not satisfy, there will be no ‘reply’ variable and hence you might be getting that error.
We would suggest you to add more if conditions for other actions or declare variable “reply” even if there are no actions.
I have created an front end chat app with submit button in django. Now, how can i integrate dialogflow to retrieve data from database and show it in app after clicking the submit button.
what I have done is I created python code that http url and used that url in dialogflow webhook then whatever
user asks in simulator/console it gives default answer.
My requirement:
All code should be in Python (flask)
The user ask something(querytext) in simulator (console) that thing(querytext) I need to save in some file using my Python code on based date and time. In the same time I need to send my default answer to that question asked my user in console.
For the above requirement, you have any suggestions for me and any tips or suggest blogs for reference.
hi ive followed the tutorial and I got this error towards the end
Watching for file changes with StatReloader
Performing system checks…
Exception in thread django-main-thread:
Traceback (most recent call last):
File “C:\Program Files\Python38\lib\threading.py”, line 932, in _bootstrap_inner
self.run()
File “C:\Program Files\Python38\lib\threading.py”, line 870, in run
self._target(*self._args, **self._kwargs)
File “C:\Users\shrey\OneDrive\Documents\Django\env\lib\site-packages\django\utils\autoreload.py”, line 53, in wrapper
fn(*args, **kwargs)
File “C:\Users\shrey\OneDrive\Documents\Django\env\lib\site-packages\django\core\management\commands\runserver.py”, line 117, in inner_run
self.check(display_num_errors=True)
File “C:\Users\shrey\OneDrive\Documents\Django\env\lib\site-packages\django\core\management\base.py”, line 392, in check
all_issues = self._run_checks(
File “C:\Users\shrey\OneDrive\Documents\Django\env\lib\site-packages\django\core\management\base.py”, line 382, in _run_checks
return checks.run_checks(**kwargs)
File “C:\Users\shrey\OneDrive\Documents\Django\env\lib\site-packages\django\core\checks\registry.py”, line 72, in run_checks
new_errors = check(app_configs=app_configs)
File “C:\Users\shrey\OneDrive\Documents\Django\env\lib\site-packages\django\core\checks\urls.py”, line 13, in check_url_config
return check_resolver(resolver)
File “C:\Users\shrey\OneDrive\Documents\Django\env\lib\site-packages\django\core\checks\urls.py”, line 23, in check_resolver
return check_method()
File “C:\Users\shrey\OneDrive\Documents\Django\env\lib\site-packages\django\urls\resolvers.py”, line 407, in check
for pattern in self.url_patterns:
File “C:\Users\shrey\OneDrive\Documents\Django\env\lib\site-packages\django\utils\functional.py”, line 48, in __get__
res = instance.__dict__[self.name] = self.func(instance)
File “C:\Users\shrey\OneDrive\Documents\Django\env\lib\site-packages\django\urls\resolvers.py”, line 588, in url_patterns
patterns = getattr(self.urlconf_module, “urlpatterns”, self.urlconf_module)
File “C:\Users\shrey\OneDrive\Documents\Django\env\lib\site-packages\django\utils\functional.py”, line 48, in __get__
res = instance.__dict__[self.name] = self.func(instance)
File “C:\Users\shrey\OneDrive\Documents\Django\env\lib\site-packages\django\urls\resolvers.py”, line 581, in urlconf_module
return import_module(self.urlconf_name)
File “C:\Program Files\Python38\lib\importlib\__init__.py”, line 127, in import_module
return _bootstrap._gcd_import(name[level:], package, level)
File “”, line 1014, in _gcd_import
File “”, line 991, in _find_and_load
File “”, line 975, in _find_and_load_unlocked
File “”, line 671, in _load_unlocked
File “”, line 783, in exec_module
File “”, line 219, in _call_with_frames_removed
File “C:\Users\shrey\OneDrive\Documents\Django\djangotest\djangotest\urls.py”, line 21, in
path(‘home/’, views.home, name=’home’),
AttributeError: module ‘myapp.views’ has no attribute ‘home’
please help me out
Hello Shreya,
In webhook code home function was not defined in the second code. So, we have updated the code. Can you please copy the new code and try?
Sorry for the inconvenience. Hope this helps.
Thanks
I see there are lot of discussions going on webhook call. Based on my observation is the mentioned URL is
https://c5c439af.ngrok.io/webhook/ just neglect the “/ ” at the end make it should look something like this https://c5c439af.ngrok.io/webhook
Hi, any chance you have a similar library for rich responses on the recently launched Dialogflow Messenger platfom that you can share?
Hello Amit,
We don’t have a library for the rich responses for Dialogflow Messenger. We are working on to create our own web widget which may be available soon.
Thanks
Hello,
Can you please update the browse carousel response for action on google in df_response_lib.py file
Hello Havish,
We already have the support for Browse Carousel card in our library. You can check the code on line # 131 in https://github.com/pragnakalp/dialogflow-response-library-implementation-python-django/blob/master/views.py file. Let us know if it’s not working for you or you want something else.
Thanks
is it possible to get suggestion chips in default response?
Yes Rida,
You can add suggestion chips in default responses.
Thanks
how can we add regular expressions for phone and email?
Hello Rida,
You can try Entities for that. Dialogflow now supports regular expressions in the entities, so you should be able to do that using Entities. Or you can do the validation from webhook code.
Thanks
What if I want to call different functions in view.py in different intents
Hello Pallav,
We didn’t quite understand your question. Can you please elaborate and provide more detail about what you want to do?
Thanks