There are multiple chatbot development platforms available if you are looking to develop Facebook Messenger bot. While each has their own pros and cons, Dialogflow is one strong contender. Offering one of the best NLU (Natural Language Understanding) and context management, Dialogflow makes it very easy to create Facebook Messenger bot.
In this tutorial, we’ll see how to integrate your Dialogflow agent with your facebook page. If you haven’t created a Dialogflow agent then first you need to create it (here is a detailed Dialogflow tutorial on how to develop Resume Chatbot) or if you already have one then let’s get started.
Create Facebook Page
First of all, we need to create a Facebook page. Open https://www.facebook.com/ and click on “+” button, and then select “Page”.
On next page, provide the name of your page and select the category and then click on “Create Page” button. Optionally upload profile picture, cover image and description for Facebook page.
Create Facebook App
To connect Dialogflow agent with Facebook Page, we’ll need a Facebook app. For that, go to https://developers.facebook.com/apps/ and click on “Create App”.
Select the appropriate option for you app and click on “Continue” button.
Provide “App Display Name” and “App Contact Email”, Select the “App purpose” and hit “Create App” button. You’ll have to go through security check to create an app.
Connect Facebook Page to the App
Our Facebook app is created, now we need to connect our Facebook page to the app. For that, we need to generate Page Access Token.
Clicking on “PRODUCTS” on left side bar will open a page with many options. Under Add A Product section, select “Set Up” for Messenger.
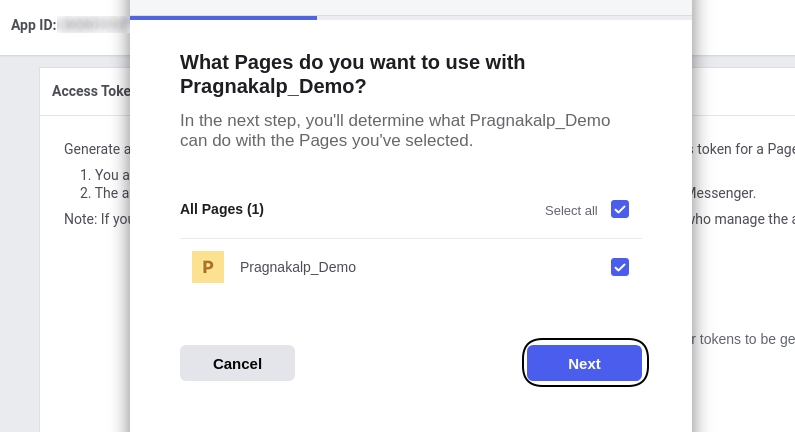
Now, select the “Add or Remove Pages”, it will open a new tab and from there select the page you want to connect, or you can create a new page directly.
Here we will be using “Pragnakalp_Demo” page which we created earlier, Select the page and click on “Next” button.
Provide the permissions to complete the process, and click on “Done”.
You have now successfully linked your app to the Facebook page.
Under “Access Token” section, click on “Generate Token” to generate the Access Token.
Select the “I Understand” check box and copy the Access Token.
And our Page Access Token is generated. This will be required in next steps.
Enable Facebook Messenger Integration in Dialogflow
To publish Dialogflow agent on our Facebook app, go to https://dialogflow.cloud.google.com/#/agent. here, we need to enable Facebook Messenger integration under Integration tab of Dialogflow.
Clicking on Toggle of Facebook Messenger will open up a popup. In this popup we need to provide the “Verify Token” which can be any random string. We also need to provide the “Page Access Token” of Facebook App which we generated in earlier steps.
After filling up Verify Token and “Page Access Token” click on “START” button which will activate the Dialogflow webhook for our agent. Please copy “Callback URL”, we will need it in next step.
Setup Webhook in Facebook App
We are done with configuration of Dialogflow agent. Now, we need to setup webhook in Facebook App which will communicate with Dialogflow Agent.
To setup webhook, open Settings page of Facebook App and click on “Add Callback URL” button under “Webhooks” section.
To copy “Callback URL” and “Verify Token” from the Dialogflow agent, open Integrations page and click on Facebook Messenger. That will provide us with the required values. Copy from there and paste it in the popup and hit the “Verify and Save” button.
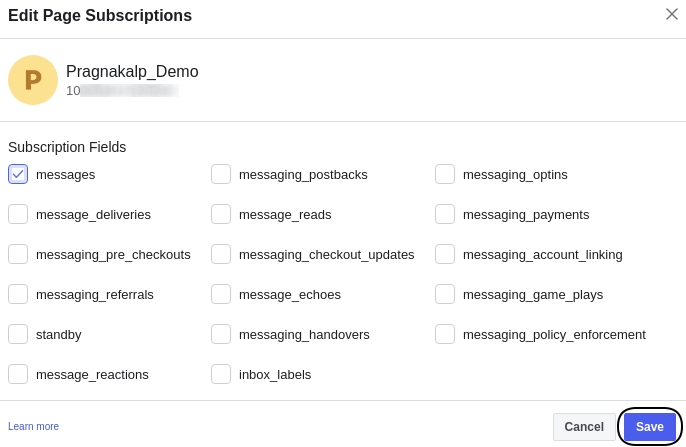
For Subscription Fields, Click on “Add Subscriptions” button and it will open a pop up.
Here, “messages” and “messaging_postbacks” are sufficient to get started with basic bot. So, we select only those 2 for now.
Activate Facebook App
Now, last step in configuration is to Activate the Facebook App. To do that, browse to Basic Settings of the page (from left sidebar) and provide “Privacy Policy URL”. Make sure that you have selected the app that you have create earlier.
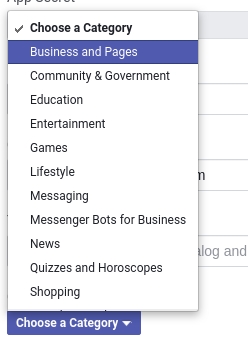
Another mandatory setting is selecting category. Clicking on “Choose a Category” will open up a popup where we can select appropriate category of our app.
Minimum required settings of App is in place. Click on “Save Changes” to save the settings.
We are done with all the settings! Time to test the bot on our page.
Setup Message Button Facebook Page
Open your Facebook Page and click on “Add a Button”.
It will open a popup. In first step, select “Send Message”.
You will see “Edit Send Message” button on the page now. Your visitors can click it and start chatting with your page. As you are admin, you will need to click on the “Edit Send Message” button and click on “Test Button” option.
It will open up the chat window. Click on “Get Started” button and, say “hi”, you should receive the Welcome message of your Dialogflow agent.
Awesome! The bot is working now!
If you don’t receive the message then make sure that Default Welcome Intent has Facebook Welcome added as Event. Also confirm that the Default Welcome Intent has proper training phrases to invoke the intent.
Bot is not live for visitors yet
Please keep in mind that this bot is not yet live for your page visitors yet. You can access it as you are admin of the page. To make it available for your visitors, you will need to go through Messenger Bot approval process of Facebook. We’ll cover that approval process in next tutorial.
Do let us know your feedback about this tutorial in comment section. Also, you can post your doubts in comments section if you have any question or get stuck anywhere. We would love to provide further help.
Do share the tutorial if you found it useful.
Pragnakalp Techlabs: Your trusted partner in Python, AI, NLP, Generative AI, ML, and Automation. Our skilled experts have successfully delivered robust solutions to satisfied clients, driving innovation and success.