

What is webhook?
A webhook is a user defined HTTP callback that is automatically invoked whenever certain criteria is fulfilled. A webhook can be created in any server-side programming language like Python, PHP or Node.js. You can read more about webhook here.
In Dialogflow, a webhook can be used to fetch data from your server whenever a certain intent having webhook enabled (don’t worry, we will see that) is invoked. The information from the intent is passed to the webhook service to receive the result.
We are going to use Ngrok, (a web tunneling tool) that can be used to call webhook from your local server. You can download Ngrok from ngrok.io.
Let’s start building our own Dialogflow agent with a webhook using Python (Flask) and deploy it using Ngrok.
Install Python
Download and install python from here as per your supported OS.
Install Flask using PIP
Flask is a lightweight web framework that can be used to create webhook services which can communicate with external applications (in our case Dialogflow’s agent). To use flask in our app, first we need to install it. It can be easily installed using “pip”. If “pip” is not installed then you will need to install it first.
pip install FlaskFor more information, you can visit: https://pypi.org/project/Flask
Creating webhook using Python
Let’s create a basic flask app.
# import flask dependencies
from flask import Flask


# initialize the flask app
app = Flask(__name__)


# default route
@app.route('/')
def index():
   return 'Hello World!'


# create a route for webhook
@app.route('/webhook')
def webhook():
   return 'Hello World!'


# run the app
if __name__ == '__main__':
   app.run()
Now, run the app using the following command.
python app.py or FLASK_APP=hello.py flask run
Our basic app is working now, but as it is on the local system it can not be accessed from the outside world. To integrate it as a webhook for Dialogflow, we need to make it live/online. For that, we use ngrok.
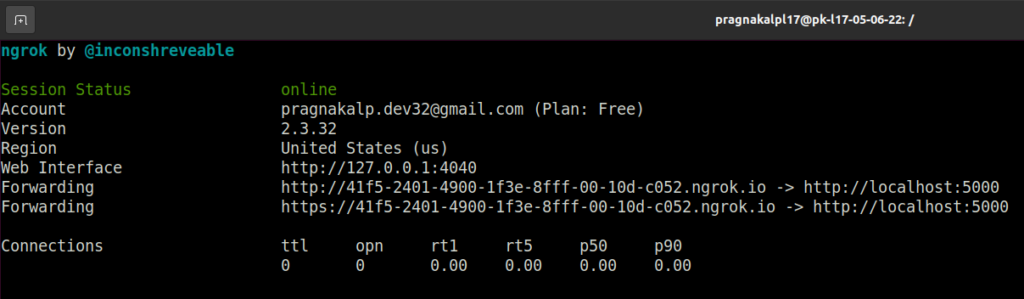
Run the webhook using Ngrok
Ngrok is a web tunnelling tool that provides a way to test APIs and webhooks from a local server. There are two versions available. We will be using the free version with registration on ngrok.io.
To run ngrok, use the following command: ngrok http <port_number>
e.g. ngrok http 5000 (for flask app)
How to setup webhook in Dialogflow
Dialogflow provides an option on the left sidebar known as Webhook. Just enter your webhook URL and webhook name generated by ngrok and you are done.
You can also customize Webhook timeout.

Be sure to add the URL with /webhook like…
https://41f5-2401-4900-1f3e-8fff-00-10d-c052.ngrok.io/webhookand not just
https://41f5-2401-4900-1f3e-8fff-00-10d-c052.ngrok.io/as we are going to handle the request on /webhook route not the index route.
If you provide a URL without webhook then you may get an error like “Webhook call failed. Error: 405 Method Not Allowed.”.
Enabling webhook for pages
Now, we need to enable the webhook for pages that need to communicate with our server data. To do that, parameters from the page for which you want to enable the webhook, scroll down to the end and enable the “webhook” from the webhook setting dropdown select the webhook and fill in the Tag box which you want to give the tag.

Whenever this page is invoked, it will send a request to your webhook and respond as per the response set from the webhook.
Building fulfillment responses from webhook
Webhook responses should be in a proper JSON format so that Dialogflow can understand what to display to the user.
Below code will prepare a simple JSON response with fulfillment text for Dialogflow. The user will receive “This is a response from webhook.” as response for this intent.
# import flask dependencies
from flask import Flask, request, make_response, jsonify


# initialize the flask app
app = Flask(__name__)
# default route
@app.route('/')
def index():
   return 'Hello World!'


# create a route for webhook
@app.route('/webhook', methods=['GET', 'POST'])
def webhook():
   return make_response(jsonify(cx_response()))


def cx_response():
   data = request.get_json(silent=True, force=True)
   tag = data["fulfillmentInfo"]["tag"]


   if tag == "Welcome":
       reply = {
           "fulfillmentResponse": {
               "messages": [
                   {
                       "text": {
                           "text": [
                               'This is a response from webhook.'
                           ]
                       }
                   }
               ]
           }
       }
       return reply


# run the app
if __name__ == '__main__':
   app.run()
You can see that we have fetched “tag” from the request using
tag = data["fulfillmentInfo"]["tag"]In our example, we have used a tag, you can use it for your purpose.
Checking response from webhook
Using the console from “Test Agent” on the right side of the window, we can invoke the intent and check the response. For our example, the response will be as below:

Using this tutorial you can create a basic webhook.
Hope this tutorial will be helpful to you in integrating webhook in your dialogflow app. If you have any questions then post it in the comment. We’ll respond to it soon.
What is Event Handler?
In Dialogflow CX, an event handler is a type of dialog node that allows you to trigger specific actions or responses based on an event that occurs during a conversation. An event can be thought of as a signal or trigger that indicates something has happened or a condition has been met.
When you create an event handler in Dialogflow CX, you specify the name of the event that it should listen for. When that event is triggered, the event handler is activated and can perform a number of actions, such as setting context, sending a message, or invoking a webhook.
Event handlers are commonly used to handle situations where the user provides specific information or triggers a specific action, such as selecting a particular item from a list, confirming an order, or asking for help. By using event handlers, you can create more complex conversational flows that respond to specific user actions or conditions.
How to set an Event handler?
- Open your Dialogflow CX agent in the Dialogflow CX console.
- Click on the “Flow” tab to open the visual flow editor.
- In the flow editor, select the dialog node where you want to add the event handler.
- In the node settings panel on the right, scroll down to the “Events” section and click the “Add Event” butt- In the “Add Event” dialog, select the event that you want to trigger the event handler.
- Optionally, you can add any additional parameters or conditions for the event handler.
- Click “Add” to create the event handler.
- You can now configure the actions that you want the event handler to perform, such as sending a message or invoking a webhook. You can do this by adding actions to the node’s response section or by adding a webhook to the node’s fulfillment section.
- Save your changes to the dialog node.

Built-in events:
The following events are built-in and are invoked by Dialogflow. Some events are restricted to certain levels.
| Event name | Invoked when |
| sys.no-match-default | – For flow or page level: end-user input does not match any intents for handlers that are in scope.- For parameter level: end-user input does not satisfy the form parameter. |
| sys.no-input-default | End-user input was not received. This can be invoked when:- Dialogflow receives empty end-user text input.- Dialogflow receives empty end-user audio input or the input does not contain any recognized speech.- A no speech timeout occurs before the end-user audio input contains any recognized speech. |
| webhook.error | The webhook call returned an error. This event is only invoked: 1) if there is no fine-grained webhook event handler (e.g. webhook.error.timeout) that matches the webhook error code, 2) if there is no transition target set in the original route that called the fulfillment with the failing webhook. See the evaluation order section for details. |
You can refer to more built-in events at this link https://cloud.google.com/dialogflow/cx/docs/concept/handler#event-built-in
What is an entity?
An entity represents a specific object or concept that you want your chatbot or virtual assistant to be able to recognize and respond to. Entities are used to extract important information from user input and to help your bot understand the meaning of what the user is saying.
An entity can be a simple value, such as a number or a date, or a more complex value, such as a product name or a location. When a user inputs a message, Dialogflow CX analyzes the text and extracts any relevant entities that are mentioned. For example, if a user asks “What’s the weather like in New York?”, Dialogflow CX can extract the entity “New York” as a location.
Entities in Dialogflow CX can be either system-defined or user-defined. System-defined entities are built-in entities that are provided by Dialogflow CX, such as “@sys.date-time” or “@sys.number”. User-defined entities are entities that you define yourself, based on the specific needs of your chatbot or virtual assistant. You can create a user-defined entity by defining a list of possible values or by using regular expressions to match patterns in user input.
Once you have defined an entity in Dialogflow CX, you can use it in intents to match user input and extract the relevant information. You can also use entities to set parameters in fulfillment or to generate dynamic responses based on user input. By using entities effectively, you can create a more natural and conversational experience for your users.
Custom entity:
You can create custom entities to recognize and extract information from user inputs. Custom entities are used to represent specific concepts or objects that are relevant to your conversational AI application.
To create a custom entity in Dialogflow CX, follow these steps:
- In the Dialogflow CX Console, go to the Entities page.
- Click on the Create Entity button.
- In the Create Entity dialog box, enter a name for your entity.
- Choose a type for your entity. There are several types available, including:
- Custom: A custom entity that you define.
- System: A predefined system entity that recognizes common concepts such as dates, times, and numbers.
- RegEx: A regular expression entity that matches patterns in user input.
- Select the language that your entity will be used in.
- If you choose Custom as the type for your entity, define the values that your entity can recognize. You can enter individual values, or you can import a list of values from a CSV or JSON file.
- Click on the Create button to create your custom entity.
Once you have created your custom entity, you can use it in intents and fulfillments to extract information from user input and use it to provide relevant responses.
Feel free to comment your doubts/questions. We would be glad to help you. If you are looking for Chatbot Development or Natural Language Processing services then do contact us or send your requirement at letstalk@pragnakalp.com. We would be happy to offer our expert services.